

A leak between the media and a drip on the floor are two different faults
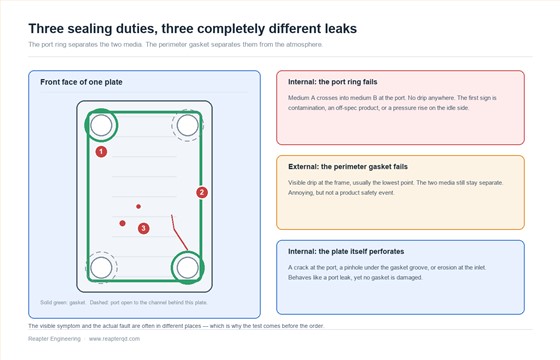
When a gasketed plate heat exchanger starts to leak, the useful first question is not "which gasket?" but "which of the two seals failed?" A plate pack does two independent sealing jobs. The perimeter gasket keeps the media inside the unit. The port gasket ring keeps the two media apart. A perimeter failure announces itself as a drip you can see and mop up. A port ring failure, or a hole in a plate, announces itself as contamination you cannot see — until the product is off-spec, the boiler water tests positive for oil, or detergent turns up in the wrong circuit.
That distinction decides everything downstream: which side to pressurise, which part to order, and whether the unit can keep running while the part is in transit. It is also where most expensive mistakes begin, because the visible symptom and the actual fault are often in different places.
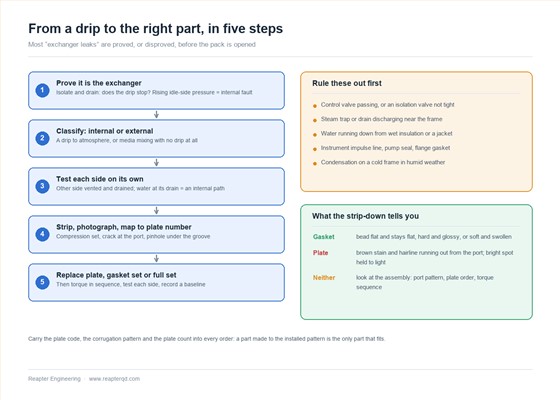
A large share of call-outs that arrive as "the exchanger is leaking", with a photograph of a drip, turn out not to be the exchanger at all. A passing control valve, a steam trap discharging onto the frame, water running down from wet insulation, or a leaking pump seal will all produce the same photograph.
How a gasketed pack keeps two media apart
Each plate carries a gasket pressed into a groove. The gasket runs around the plate perimeter and around two of the four corner ports; the other two ports are left open on that plate, so the channel between it and its neighbour connects to the header. Plates alternate, so one medium occupies the channels between plates 1–2, 3–4, 5–6, and the other occupies 2–3, 4–5, 6–7. The pattern of port rings is what routes each medium into the correct channel — and therefore what guarantees the two never meet.
Sealing comes from compression, not adhesion. The gasket sits in its groove, the adjacent plate lands on it, and the tie bolts compress the whole stack. Two consequences follow. A gasket that has taken a permanent compression set will not recover when the pack cools, so a leak that appears cold and disappears hot is a gasket symptom, not a mystery. And a plate that has been deformed — by over-tightening, or by a water hammer event — will not sit flat on the gasket, and no additional torque will correct it; it will simply crush the gasket elsewhere.
Read the symptom before you open the pack
The four common paths leave different evidence, and the evidence is usually available before a spanner is used. The table maps what is observed to what it implies.
| Path | What you observe | What is mixing | Usual cause |
|---|---|---|---|
| Port gasket ring | Contamination, colour or conductivity change in the low-pressure circuit; pressure on the idle side creeps up | Medium A into medium B | Compression set, chemical swelling, wrong port pattern after a rebuild |
| Plate perforation or crack | Slow crossover, often only at high differential pressure or high temperature | Medium A into medium B | Chloride stress corrosion at the port, crevice corrosion under the groove, erosion at the inlet |
| Perimeter gasket | Visible drip at the frame, usually the lowest point; the two media stay separate | Medium to atmosphere | Hardening or heat ageing, over-compression, uneven torque, corroded plate edge |
| Port, liner or frame | Drip at the nozzle or between the pressure plate and the first plate | Medium to atmosphere | Liner damaged during pipe connection, gasket rolled out of its groove, warped pressure plate |
Two rows in that table behave almost identically from the outside, and that is the practical difficulty. A port ring failure and a perforation both produce contamination with no visible drip, and both get worse as the pressure difference between the circuits rises. Only a strip-down, or a test that separates the two sides, tells them apart.
Four tests that localise the fault
- Prove it is the exchanger. Close the isolation valves, drain both sides, and see whether the drip stops. If it continues, the source is upstream or downstream. Then look at the idle side: with both sides isolated and one side under pressure, a rise on the idle side gauge means the fault is inside the pack. This single check removes most false alarms, and it costs ten minutes.
- Test each side on its own. With the pack assembled, vent and drain one side fully and pressurise the other to design pressure with water. Water appearing at the open side's drain or vent is an internal path. Where it appears narrows the location: at a drain on the same end as the inlet port points to a port ring or a port-area crack; at the frame points to the perimeter. Use water rather than air for the first test — a plate pack holds a large volume of stored energy and a sudden release of compressed air is a hazard.
- Use a tracer. Add fluorescent dye or raise the chloride or conductivity of one circuit, circulate, then sample the other circuit at its lowest point. A tracer finds leaks far smaller than a pressure decay test on a large pack, and it works without stripping the unit.
- Isolate in sections. In a long pack, blanking plates between plate groups let you test half, then a quarter. This is the fastest way to locate a single failed plate in a hundred-plate stack — but on many designs it disturbs the gaskets, so plan it as one deliberate exercise rather than a repeated probe.
Gasket failure or plate perforation?
On strip-down the evidence is often in a different place from where it is expected. A failed gasket shows a flattened bead that stays flat when the plate is laid on a bench, or a gasket that has gone hard and glossy with heat, or soft and swollen with chemical attack. The plate behind it is clean and bright.
A perforation leaves a path. Look at the port area first: it is the most heavily formed and thinnest part of the plate, and where a chloride stress corrosion crack usually begins — a hairline running outward from the port hole, frequently with a brown stain around it on a 304 or 316 plate. Look next beneath the gasket groove, where crevice corrosion starts as a pinhole in a stagnant gap and cannot be seen from the channel side at all. Look last at the plate edge, where an inlet jet can thin the metal by erosion.
Two checks settle it. Hold the suspect plate against a strong light and look for a bright spot through the sheet, then repeat with the plate warmed — a crack that opens at 90 °C can close at 20 °C, which is why a plate that leaked in service sometimes appears sound on the bench. And check the whole pack's gasket condition before deciding on scope: one failed gasket in a pack of the same age usually means the rest are close behind.
Why the wrong diagnosis costs more than the part
Plates and gaskets are a small fraction of the cost of a shutdown. The logistics are not. A wrong order becomes a second ocean freight, a second shutdown and a second set of gaskets, and the unit that was meant to be back online in a week is offline for a month.
Three identifiers make any order unambiguous, and they should be recorded before the pack goes back together: the plate model code stamped on the plate or on the frame nameplate; the plate pattern — corrugation depth and chevron angle — because a pack that mixes two patterns will not distribute flow evenly and will leak again at the joint between them; and the plate count and order, including any blind or flow-directing plates.
For an operator far from the factory, the practical mitigation is modest and effective. Hold a strategic spare set: one gasket set for a full rebuild, plus two to five percent of the plate count in the most likely pattern, recorded under the same identifiers. Photograph the strip-down with a scale in frame and mark the leaking plate. And send the pressure test record with the enquiry, so the part is made to the installed pattern rather than guessed from a model number that three different plate patterns may share.
Reassembly and proving the repair
- Clean every groove; fit new gaskets; check each plate for flatness, for pattern match and for the port pattern before it goes into the stack.
- Assemble in the recorded order. Plates alternate, and a single plate turned the wrong way changes which channel a port feeds — the unit will then cross-contaminate while every gasket is new.
- Tighten to the specified pack dimension or torque, diagonally and in stages — roughly one third, two thirds, then full. Over-tightening deforms plates and shortens gasket life as reliably as under-tightening.
- Pressure test each side separately before return to service, and hold at design pressure long enough to see a slow path, not just a fast one.
- After the first thermal cycle, re-check the pack dimension and re-torque where the manual requires it. A hot-to-cold cycle relaxes the whole stack, which is why leaks often appear the first time a repaired unit cools down.
- Record a baseline: pressure drop on both sides at design flow, and the approach temperature at design duty. The next event is then diagnosed by comparison instead of from memory.
Common questions
Can the unit keep running with a small internal leak?
That is a process safety and product quality decision, not a maintenance one. Where the two media are product and utility, a crossover puts utility water into product or product into a service main, and the acceptable leakage rate is zero. Where both circuits carry the same medium — two water streams in a heating network, for example — a temporary run at reduced differential pressure may be tolerable while parts are ordered, provided the loss is monitored and the reason is written down.
The leak stops when the exchanger is cold. Is that normal?
It is a symptom, not a normal condition. A gasket that seals hot and leaks cold has taken a compression set and no longer follows the plate as the pack contracts. A crack that opens hot and closes cold is the opposite pattern. Both point to a part that needs replacing, and the temperature dependence is a useful clue to which one.
Can a single gasket be replaced instead of the whole set?
It can be done, and sometimes it is the right call — a mechanical tear during handling, for instance. But gaskets in a pack share an age and a thermal history, so a partial rebuild on a unit that has run for years usually produces a second failure within weeks. On a large pack, price the full set against the cost of a second shutdown before deciding.
How do I tell a plate crack from a gasket leak without stripping the unit?
Pressurise one side with the other side vented and drained, and watch where water appears. At the frame it is a perimeter gasket; at the drain or vent of the other side it is an internal path, which is either a port ring or a plate. A tracer test then confirms it, and only the strip-down distinguishes the two internal causes.
Why did a 316 plate crack at the port?
Chloride stress corrosion cracking is the usual answer, and the port area is where it starts because forming leaves residual stress and the section is thin. Chloride concentration, temperature and stagnant periods all drive it; above roughly 60 °C, chloride levels that are harmless in a cold circuit become aggressive. The remedy is usually a change of material or a change in operating practice, not a thicker plate.
How Reapter supports leak investigations
We ask for three things before quoting a repair part: the plate model code, photographs of the strip-down with the leak marked, and the pressure test record. From those we identify the installed plate pattern and produce replacement plates or a gasket set to match it — including for units built by other suppliers, so a mixed fleet can be supported from one source and one delivery schedule.
For units in service outside China, spare plates and gasket sets are packed for sea or air freight and issued with the plate arrangement chart and the tightening dimension, in the project language where required. Test records and photographs sent to our engineering team are reviewed against the installed pattern and answered in writing, so a diagnosis does not have to wait for a site visit.
Send the plate code and the photographs, and we will tell you which part the evidence points to. Contact us to request a quotation.
Reapter Engineering Team · Qingdao Ruipute Heat Exchange Equipment Manufacturing Co., Ltd.
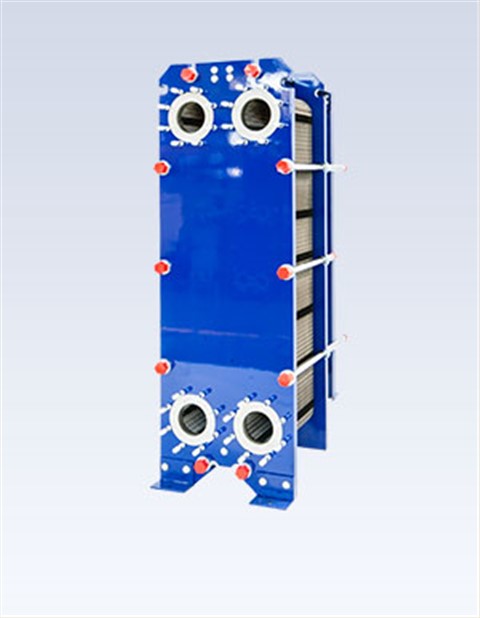 Food grade plate heat exchanger
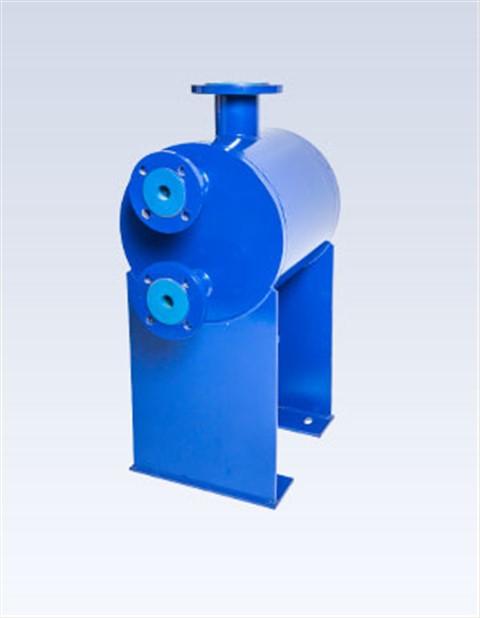 Plate And Shell Heat Exchanger